Amazon Web Services (AWS) provides robust tools for managing and monitoring your EC2 instances. Ensuring that your instances remain healthy and responsive is critical. On some of my AWS WordPress website projects, I have noticed that that my website becomes unresponsive periodically and the instance fails connectivity checks. At this point I had to reboot the instance for it to come back online. AWS offers status checks that automatically monitor the health of your instances and, in the event of a failure, can trigger actions (like a reboot) to remediate issues. In this blog, we’ll walk through setting up an action to automatically reboot an EC2 instance if it fails a connectivity check.
Prerequisites
Before we get started, make sure you have the following:
- An AWS account with administrative access.
- An EC2 instance running in your account.
- Basic understanding of AWS Management Console navigation.
Step-by-Step Guide
Step 1: Access the EC2 Dashboard
- Login to AWS Management Console: Open your web browser and log in to the AWS Management Console.
- Navigate to EC2 Dashboard: In the AWS Management Console, type “EC2” in the search bar and select EC2 from the drop-down list to open the EC2 Dashboard.
Step 2: Select Your Instance
- Instances Menu: On the left-hand side of the EC2 Dashboard, click on Instances under the “Instances” section.
- Choose Your Instance: From the list of instances, select the instance for which you want to set up the action. Click on the checkbox next to the instance ID to highlight it.
Step 3: Create a Status Check Alarm
- Status and Alarms Tab: With your instance checked, go to the Status and Alarms tab in the lower pane.
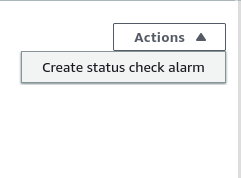
- Actions Menu: Click on the Actions button.
- Create Status Check Alarm: From the drop-down menu, select Create Status Check Alarm. This will open the Manage CloudWatch Alarms window.

Step 4: Configure the Alarm
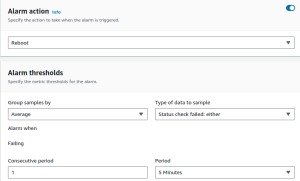
- Enable Alarm Action: In the Manage CloudWatch Alarms window, make sure to enable the alarm action.
- Select Action Type:
- Choose Reboot this instance as the action to take when the alarm is triggered.
- Define Alarm Conditions:
- Select Metric: Choose Status Check Failed (Any) from the list of metrics.
- Conditions: Define the conditions that will trigger the alarm. Typically, you would set this to trigger if the status check fails for 1 or more consecutive periods (e.g., 1 out of 1 data points).
- Notification: Optionally, you can set up a notification to alert you when the alarm state is triggered.
- Notification Type: Choose Send a notification to.
- SNS Topic: You can select an existing SNS topic or create a new one to receive notifications.

Step 5: Review and Create
- Review Settings: Carefully review all your settings to ensure everything is configured correctly.
- Create Alarm: Once you’re satisfied with the configuration, click Create Alarm.
Step 6: Verify Alarm Configuration
- View Alarms: After creating the alarm, navigate to the Alarms section under CloudWatch in the AWS Management Console to view your newly created alarm.
- Test Alarm: Optionally, you can test the alarm by simulating a status check failure or by temporarily stopping network traffic to the instance.
Conclusion
Setting up an automatic reboot action in AWS EC2 when an instance fails a connectivity check is a straightforward process that can save you time and help maintain the availability of your applications. By following the steps outlined above, you can ensure that your EC2 instances are automatically rebooted if they encounter connectivity issues, thereby minimizing downtime and improving the reliability of your infrastructure.
Regularly monitoring and managing the health of your EC2 instances is crucial for maintaining a resilient cloud environment. With AWS’s built-in tools and a few simple steps, you can automate the remediation of common issues and keep your systems running smoothly.
